As part of my ongoing work towards the MCM Certification in SQL Server, something I wanted to look into was the creation of a cluster to play with. It turns out this isn’t a straightforward as you might think (!).
DISCLAIMER – This isn’t a plan for a live production environment. It is a plan for a set of Virtual Machines, that you can use to play with.
DISCLAIMER 2 – This is most certainly not a guide on how to use FreeNAS. This method works, but I make no claims that this is the best way to do it, as I’m certainly not a FreeNAS Expert.
 To get the process around creating a cluster together, I’m going to write a few blog posts:
Part 1 – Creating the storage (This post)
Part 2 – Creating the Windows Cluster (Pending)
Part 3 – Creating the SQL Server Cluster (Pending)
There may be additional parts…
I’m anticipating creating a network as shown in the diagram to the right.
It’ll be a Windows Domain, so there’ll be a Domain controller (VMLAN-DC), two SQL Server’s which’ll eventually be running in a Cluster.
One thing that a Cluster needs is a shared storage area. To achieve this, I’m going to use FreeNAS, which is an Open Source Storage Platform. It’ll allow me to create ISCSI-3 drives and since Requirements for Windows clustering specify Serial attached SCSI, Fibre Channel or ISCSI for storage, that’ll work.
Step 1 – Download FreeNAS
I’m going to use FreeNAS 8 since that is the current (at this date) version. It’s a free download, so go here, and set it downloading (approx. 130mb).
Step 2 – Start your Virtualisation
Next up, start your virtualisation engine of choice. I’m going to use VMWare Workstation 8, as it’s always served me well in the past, and it gives me flexibility that I need. I imagine this process should work with other Virtualisation platforms. Create yourself a VM, and I’m giving it the following specification:

2 Gb RAM, which I may reduce after testing, and just the one core.
Hard Disk 1 will be used by FreeNAS.
Hard Disk 2 will be the Quorum disk (used for Clustering).
Hard Disks 3-6 will be available for shared storage (Data, Log, Tempdb, Backup).
Virtually insert the ISO Image, and start the VM.

Choose Option 1 to Install to a Hard Drive

Choose da0 to install to the appropriate Disk.

Click Yes, to continue with the installation.

Upon completion, Press OK, Choose 4 to Shutdown the machine, and when it’s done, ‘eject’ the ISO Image.
Then restart the VM. When it has completed starting up, you’ll be presented with a screen similar to this:

The important bit here is the web address at the bottom. Open that up in a browser.

Step 3 – Configuring FreeNAS
The first thing to do is assign a password, as this’ll get rid of the annoying red light in the top right corner. Click the Account Icon, choose the Change Password option and enter a new password.
The next thing we need to do is to add the storage devices into FreeNAS. Do this by clicking on the Storage icon at the top, then click on Create Volume

Then enter the volume name, pick the Member disks and choose ZFS as the filesystem, then click Add Volume. I’m going to create them as follows:
quorum – da1
disk1 – da2
disk2 – da3
disk3 – da4
backup – da5
This should give you the following results:

Step 4 – Configuring iSCSI
Next click on the Services icon, and click the spanner next to the iSCSI service.

In here, you’ll have a number of tabs. First, we’ll need to create a Portal:

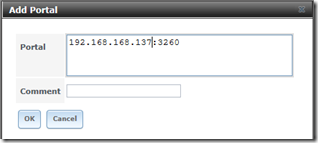
So, click the Portals tab, and click Add Portal. The IP Address of the server should appear in the box, if you have 0.0.0.0, replace it with the IP Address of the server, so it should be <ipaddress>:3260. Then click ok.

Next click, Authorized Initiator, to add an Initiator. Leave the defaults here (ALL and ALL) and click Ok.

Next go to the Targets tab, and click Add Target. You need to add a target for each disk, so for each, you’ll need to add a name, choose Disk as Type, Choose 1 for Portal Group and 1 for Initiator Group, and click OK. Repeat this for each disk. This should result in this screen:

Next we need to add extents to the NAS, so click on the Extents tab, and click Add Extent. Again, we need to create one for each disk, so enter a name, choose the path, and add /<diskname> to the end, and specify the extent size, which’ll be 10240MB for the 10gb disks. Repeat this for each disk.

So, you’ll have these extents:

Next we need to associate the Targets we created earlier, with the Extents. Click on the Associated Targets tab, click Add Extent to Target, and for each disk, pick the Target and Extent to match.
Next, click the System Icon, click Reboot, and let the system reboot. When it comes back up, log in to the Web UI again, click the Services icon, and click the On/Off Toggle next to iSCSI and it should start.

Step 5 – Testing iSCSI
The easiest way to test that the iSCSI connection works is to run the iSCSI Initiator, which’ll be on a server, or your Windows 7 Desktop. Go to Start -> Administrative tools and click iSCSI Initiator. It’ll ask to start the service. Say yes.
Then, in the Target box at the top, enter the IP Address of your FreeNAS VM, and click Quick Connect. If all is working, you’ll be presented with the list of disks from the FreeNAS VM.

Congratulations, you’ve created a FreeNAS Environment for your Cluster!
Next up, creating the Windows Cluster


 As can be seen in the proposed architecture diagram to the left, we have a Shared Storage device, and next we’ll be setting up the Windows Servers, then adding the two SQL Server boxes together to create a cluster.


