Recently, I’ve been working on a project where the reference data is stored in SharePoint lists. While it is possible to get the information out of the SQL Server database directly, using something like the T-SQL below, it’s a bit messy.
1: SELECT dbo.UserData.tp_ID,
2: dbo.UserData.tp_ListId,
3: dbo.UserData.tp_Author,
4: dbo.UserData.nvarchar1,
5: dbo.UserData.nvarchar2,
6: dbo.UserData.nvarchar3
7: FROM dbo.Lists
8: INNER JOIN
9: dbo.UserData ON dbo.Lists.tp_ID = dbo.UserData.tp_ListId
10: WHERE (dbo.Lists.tp_title like 'TestList')
11:
I wasn’t able to use this to get the data out, as the client doesn’t allow direct access to the SharePoint database, which is entirely reasonable, given that it’s their corporate intranet.
To get around this, I found a very useful set of additional modules for Integration Services (http://sqlsrvintegrationsrv.codeplex.com/), one of which is a SharePoint List Source and Destination. These then allow you to read the data directly.
Using the SharePoint List Source & Destinations
1. The first step is to download the SharePoint List Source and Destination module from http://sqlsrvintegrationsrv.codeplex.com/, and install it.
2. Having done that, you need to start up BIDS (BI Development Studio / VS 2008) and create an ‘Integration Services Package’.
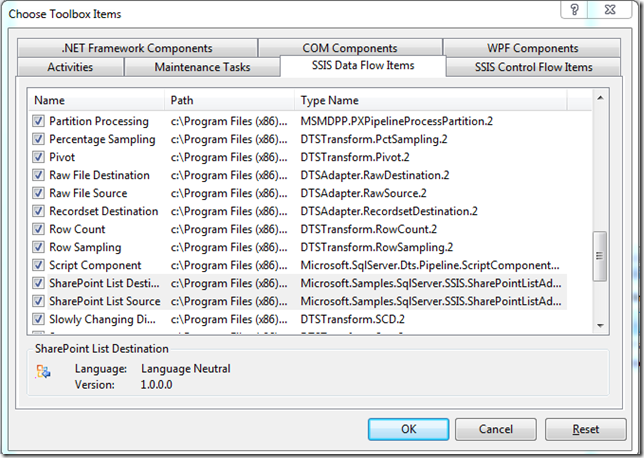
3. You’ll need to add the two new Data flow items into the Toolbox (in Tools > Choose Toolbox Items, in the SSIS Data Flow Items section)
4. Add a Dataflow Task to the Control Flow in the SSIS Package.
5. Right click on the Connection Manager Section at the bottom of the Control Flow, and choose SPCRED (Connection Manager for SharePoint Connections). Click OK, when the Dialog for the SharePoint Connection opens.
6. Then drill into the Data Flow Task, to take you to the Data Flow. In there, drag in a SharePoint List Source
7. Right click on the List Source, choose Show Advanced Editor. In the Connection Managers tab, pick the SharePoint Connection you created in step 5.
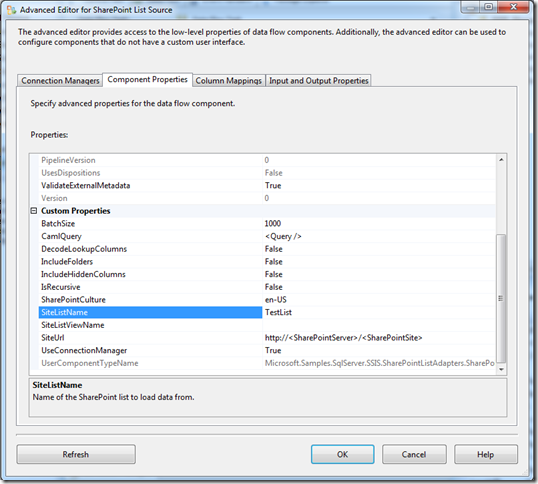
8. Next, click on the Component Properties tab. In this tab, you need to specify the Name of your SharePoint list (SiteListName) and the URL of your SharePoint server (SiteUrl). The SiteUrl is the Parent site within which your List appears. If you want to filter the information from SharePoint, you can modify the CamlQuery section in here, and add a SharePoint CAML query.
9. Once you’ve populated this, click on Refresh, and if everything is working, you’ll be able to move to the next tab. If there are errors (such as an incorrect SiteUrl), you’ll get errors like the one below.
10. Moving on to the Column Mappings tab, then gives you a list of fields and mappings, representing the Available fields from SharePoint (on the left) and fields that will be available to pass out of the List Source (on the right). You can remove fields that are not relevant here, if you’d like, then click Ok, to return to the Data Flow.
11. We need to add an OLE DB Connection manager, by right clicking Connection Managers at the bottom, and choosing ‘New OLE DB Connection’.
12. To get the SharePoint list contents into a database table, we need to add an OLE DB Destination, so drag that into the Data Flow and hook the Green output from the SharePoint List Source to the top of the OLE DB Destination. You’ll then see that there is a red X on the OLE DB Destination, so we need to make some changes.
13. Since we need to make changes to the OLE DB Destination, double click on the OLE DB Destination. As shown below, we need to specify a table for the SharePoint data to go to. The drop down list has a list of the tables in the database connected to the OLE DB Connection Manager, so pick a table (if you’ve made one already) or click new to create a new table.
14. Then click ‘Mappings’ on the left, and it’s possible to link the field in the source (SharePoint List) to your destination table.
15. You’ll then be able to run this SSIS Package, and assuming all is running successfully, you’ll see green boxes.
NOTE: Any text fields that are stored in SharePoint Lists, are stored as Unicode strings in the database (so nvarchar).
Further documentation on using these adapters is available here.


