Tag Archive: SharePoint


Recently, I’ve been working on a project where the reference data is stored in SharePoint lists. While it is possible to get the information out of the SQL Server database directly, using something like the T-SQL below, it’s a bit messy.

 1: SELECT      dbo.UserData.tp_ID,
 2:    dbo.UserData.tp_ListId,
 3:    dbo.UserData.tp_Author,
 4:    dbo.UserData.nvarchar1,
 5:    dbo.UserData.nvarchar2,
 6:    dbo.UserData.nvarchar3
 7: FROM            dbo.Lists
 8: INNER JOIN
 9:                  dbo.UserData ON dbo.Lists.tp_ID = dbo.UserData.tp_ListId
 10: WHERE    (dbo.Lists.tp_title like 'TestList')
 11:

I wasn’t able to use this to get the data out, as the client doesn’t allow direct access to the SharePoint database, which is entirely reasonable, given that it’s their corporate intranet.

To get around this, I found a very useful set of additional modules for Integration Services (http://sqlsrvintegrationsrv.codeplex.com/), one of which is a SharePoint List Source and Destination. These then allow you to read the data directly.

Using the SharePoint List Source & Destinations

1. The first step is to download the SharePoint List Source and Destination module from http://sqlsrvintegrationsrv.codeplex.com/, and install it.

2. Having done that, you need to start up BIDS (BI Development Studio / VS 2008) and create an ‘Integration Services Package’.

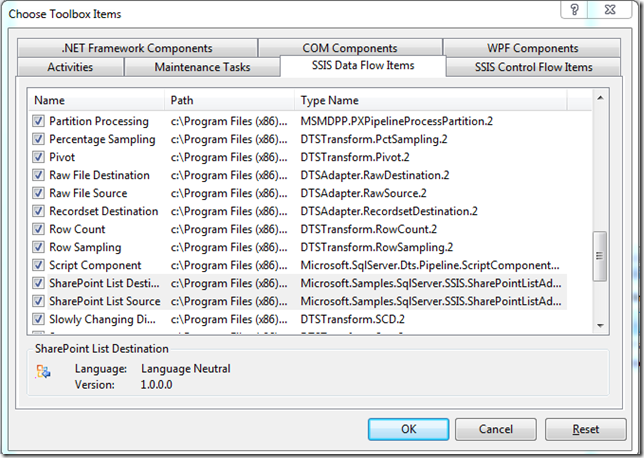
3. You’ll need to add the two new Data flow items into the Toolbox (in Tools > Choose Toolbox Items, in the SSIS Data Flow Items section)

image

4. Add a Dataflow Task to the Control Flow in the SSIS Package.

image

5. Right click on the Connection Manager Section at the bottom of the Control Flow, and choose SPCRED (Connection Manager for SharePoint Connections). Click OK, when the Dialog for the SharePoint Connection opens.

image

6. Then drill into the Data Flow Task, to take you to the Data Flow. In there, drag in a SharePoint List Source

image

7. Right click on the List Source, choose Show Advanced Editor. In the Connection Managers tab, pick the SharePoint Connection you created in step 5.

image

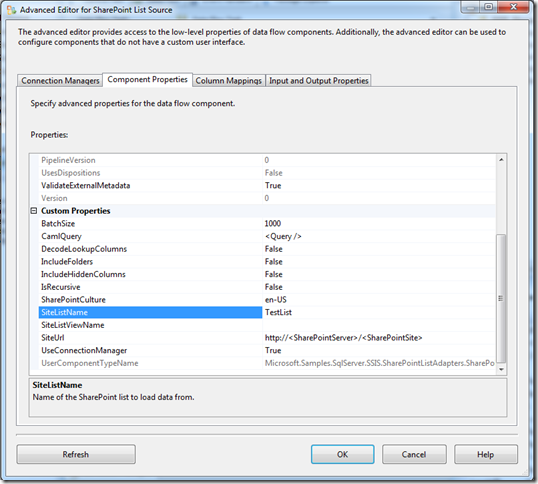
8. Next, click on the Component Properties tab. In this tab, you need to specify the Name of your SharePoint list (SiteListName) and the URL of your SharePoint server (SiteUrl). The SiteUrl is the Parent site within which your List appears. If you want to filter the information from SharePoint, you can modify the CamlQuery section in here, and add a SharePoint CAML query.

image

9. Once you’ve populated this, click on Refresh, and if everything is working, you’ll be able to move to the next tab. If there are errors (such as an incorrect SiteUrl), you’ll get errors like the one below.

image

10. Moving on to the Column Mappings tab, then gives you a list of fields and mappings, representing the Available fields from SharePoint (on the left) and fields that will be available to pass out of the List Source (on the right). You can remove fields that are not relevant here, if you’d like, then click Ok, to return to the Data Flow.

image

11. We need to add an OLE DB Connection manager, by right clicking Connection Managers at the bottom, and choosing ‘New OLE DB Connection’.

12. To get the SharePoint list contents into a database table, we need to add an OLE DB Destination, so drag that into the Data Flow and hook the Green output from the SharePoint List Source to the top of the OLE DB Destination. You’ll then see that there is a red X on the OLE DB Destination, so we need to make some changes.

image

13. Since we need to make changes to the OLE DB Destination, double click on the OLE DB Destination. As shown below, we need to specify a table for the SharePoint data to go to. The drop down list has a list of the tables in the database connected to the OLE DB Connection Manager, so pick a table (if you’ve made one already) or click new to create a new table.

image

14. Then click ‘Mappings’ on the left, and it’s possible to link the field in the source (SharePoint List) to your destination table.

image

15. You’ll then be able to run this SSIS Package, and assuming all is running successfully, you’ll see green boxes.

image

NOTE: Any text fields that are stored in SharePoint Lists, are stored as Unicode strings in the database (so nvarchar).

Further documentation on using these adapters is available here.

WebDD09 Conference

I attended the Webdd09 conference at Microsoft Reading on Saturday (yes, a Saturday…).

Was a really interesting group of sessions, covering the new features coming in Visual Studio 2010, ASP.NET 4 and Silverlight 3. It also covered some of the features of IIS 7, which has been out for a while now.

IIS 7 can automatically set up URL Rewriting. Sounds dull you say, but it effectively means that it’ll setup your website for Search Engine optimisation. Whats that you say… Well it’ll convert this:

http://www.tah.co.uk/Whatweoffer/Pages/WhereScapeRED.aspx

to this:

http://www.tah.co.uk/Products/WhereScapeRED.aspx

without you having to change anything on your website. This is a good thing as Search Engines, such as Google (84 % of the Market share) index pages based on the URL.  This is a good thing to know as Google have stopped taking into account embedded keywords on websites (the meta tags). In fact, the only meta tag they are now taking account of is the Description one. Useful stuff to know.

If you’d like to see more of the event, including the more technical presentations, you’ll be able to view the videos and PowerPoint’s here soon:

http://developerdeveloperdeveloper.com/webdd09

    Recently, Windows Update included a set of addins, including Office Live connector.

    That update extended my HTTP_USER_AGENT string to beyond 260 characters, which unfortunately IE then, when asked via javascript, reports itself back as IE 6 – this causes the Modal dialog boxes in SharePoint for things like adding web parts to zones to report a message that “Not enough storage is available to complete this operation”.

    This then causes error messages when customising SharePoint.

    This can be resolved (only if you are getting error messages) by modifying the registry. (WITH CARE!!)

    1. Go to Start -> Run -> RegEdit

    2. Go to HKEY_LOCAL_MACHINE\SOFTWARE\Microsoft\Windows\CurrentVersion\Internet Settings\5.0\User Agent\Post Platform

    3. You’ll have something similar to this:

        image

      4.Delete a couple from this list (duplicate major versions, or ones you aren’t using). Mine then looked like this:

      image

      5. Then restart Internet Explorer (including all instances).

      Cheers!

      The solution is to change a single entry in web.config, by modifying the line…

      <SafeMode MaxControls=“200“ CallStack=“false“…

      to…

      <SafeMode MaxControls=“200“ CallStack=“true“…

      You will also need to set custom errors to ‘Off’ .

      <customErrors mode=“Off“/>

      You will no longer see the “An unexpected error has occurred” error page and instead you get a lovely ’standard ASP.Net error page’ with the stack trace and everything

      Access is denied

      Do you sometimes get an ‘Access is Denied’ message when deploying a custom web part from Visual Studio, to SharePoint ?

      image

      If so, you can resolve this by stopping and restarting the Indexing service.

      1. Go to a command prompt.

      2. Type ‘net stop cisvc’

      3. Type ‘net start cisvc’

      4. Try deploying your project again.

      Ok, this is complicated to explain.

      Say, for example, that you want to have a link on a website, that a user can click on, to gain access to their Home Directory (which is retrieved from the Active Directory field).

      Ok, kind of a specific need, I know.

      What do you need to do this:

      1. Create a linked server connection, called ADSI, with the following :

      sp_addlinkedserver ‘ADSI’, ‘Active Directory Service Interfaces’, ‘ADSDSOObject’, ‘adsdatasource’

      2. Create a website in IIS, ensure that authentication is Windows Integrated, and not Anonymous.

      3. Create an ASPX page, and give it a FormView (or data enabled tool).

      4. Give it a SQL Server Data source, with a query similar to the one below:

      SELECT ‘file:’+REPLACE(homeDirectory,’\’,’/’)
      FROM OpenQuery( ADSI,’LDAP://AD_DETAILS;
      (&(objectCategory=Person)(objectClass=user));
      homeDirectory, sAMAccountName, distinguishedName’)
      where sAMAccountName in (select SUBSTRING ( SYSTEM_USER , CHARINDEX(‘\’,SYSTEM_USER)+1, len(SYSTEM_USER)-CHARINDEX(‘\’,SYSTEM_USER)) )

      This query will return the home directory, from ADSI Linked Server, for the current user.

      5. All you then need to do is bind the returned field to a button. You can do this with the following:

      <asp:HyperLink ID=”HyperLink1″ runat=”server” NavigateUrl=’<%# Bind(“homeDirectory”) %>‘> mylink is here</asp:HyperLink>

      We’ve been suffering from an intermittent issue with our Microsoft Office SharePoint Server (MOSS) over the past month or so.

      We get a message saying “the path specified cannot be used at this time” when going to the Internet Information Services (IIS) Manager section within Computer Management. This has also caused problems when trying to deploy a workflow to the MOSS Server.

      This can be resolved by restarting the Windows SharePoint Services Timer service. This then allows you to reconnect to the IIS Manager. Hooray!

      Having found a really useful entry on the  SharePoint User Group website, it says that a hotfix is now available from Microsoft to resolve this issue once and for all!

      Cheers

      A great article covering creating a custom workflow to do a Holiday Approval process.

      Originally posted here:

      http://www.u2u.info/Blogs/Kevin/Lists/Posts/Post.aspx?ID=39


      From time to time I hear from SharePoint users that they always have to wait for their developers if they want to have a workflow that is not available ‘Out Of The Box’.

      As a respond I ask them which workflow they want to use or have and apparently most of the workflows can be created in SharePoint Designer without writing one line of code.

      In this article I’m going to create a ‘Content Approval’ lookalike workflow, named the ‘Holiday Request Approval’ workflow (Human Resource managers can thank me later :-)).

      Before we open up SharePoint designer, we need a ‘Task’ list and a ‘Holiday Requests’ list, which is based on the ‘Custom List’ template. So the easiest way is to create a site based on a ‘Team Site’ and add a custom list.

      1. screen_ListsinQuickLaunch

      In the ‘Holiday Request’ list we create some holiday related columns, such as ‘start date’ and ‘end date’.

      2. screen_ColumnsInList

      Now it’s time to open up SharePoint designer and load the site where we can find these holiday requests:

      3. screen_OpenSiteInDesigner

      Once the site is open and loaded, we are going to add a new Workflow by clicking on File –> New –> Workflow button:

      4. screen_NewWorkFlow

      The cool thing about creating Workflows in SharePoint Designer is, that it’s nothing more than running through a wizard and that you can create pretty nice Workflows without writing a line of code.

      Wizard Step 1:

      In this step we need to provide a title for the Workflow, in our case it is ‘Holiday Request Approval‘. Next you need to specify on which list or library you want to use it and when you want to start the workflow.

      We are going to start it automatically when a new item is created in the ‘Holiday Requests’ list:

      5. wizardscreen_step1

      Wizard Step 2:

      When an employee adds a request for a holiday, we need to create a task for the Human Resource manager who needs to approve or reject the request.

      So we need to create a kind of special form where the manager can select his choice. Because I don’t want to write one line of code I’m going to let SharePoint Designer create the form.

      At the end, the form will look like this:

      36. Whooow

      So the action that we are going to use is the ‘Collect Data From User’ action:

      6. wizardscreen_step2_CollectDataFromUser

      7. wizardscreen_step2_CollectDataFromUserLine

      As you can see on the screen above, you need to provide three things:

      1. The data that needs to be collected
      2. The user that needs to provide the data, the human resource manager
      3. A variable to collect, I’m coming back on this later …


      data

      First click on the data link and a new wizard will pop up:

      8. wizardscreen_step2_datawizard1

      8. wizardscreen_step2_datawizard2

      We need to collect 2 things from the human resource manager:

      • Can the employee go on holiday or not?
      • Some extra comments

      Click on the add button to add these two questions on the page.

      10. wizardscreen_step2_datawizard3

      First question is the status where we are going to use a choice field so that the manager can choose between Approve or Reject:

      11. wizardscreen_step2_datawizard3_1

      12. wizardscreen_step2_datawizard3_11

      Click Finish and add another field to make it possible for the manager to add some comments:

      13. wizardscreen_step2_datawizard3_2

      14. wizardscreen_step2_datawizard3_22

      15. wizardscreen_step2_datawizard4

      Once you’ve added these two fields click on the Finish button to complete the data part of the action.


      User

      The next step we need to tell who the human resource manager is so a task can be assigned on his name

      (because I always wanted to approve a holiday, I will play the manager for now):

       16. wizardscreen_step2_thisuser

      17. wizardscreen_step2_thisuser_1


      Variable to collect:

      What we’ve actually done is, we’ve created a task for the human resource manager (me) to approve or reject the holiday.

      Because we want to use the outcome of this task we need to save the ID of the task that we’ve created. This is is the variable that we want to collect.

      We are going to store the ID of the task in a new variable which we call HolidayRequestTaskID:

      18. wizardscreen_step2_newvariable

      19. wizardscreen_step2_newvariable_1

      Once we’ve completed the first action we need to save the respond of the human resource manager. With respond I mean, what is the status and what is the comment that the manager gave.

      To save these responds we need to create 2 variables and store the responds in these variables.

      Find the Action ‘Set Workflow variable’. If you don’t find it click on ‘More Actions…’.

      20. wizardscreen_step2_NewAction

      21. wizardscreen_step2_SetWorkflowVariable

      22. wizardscreen_step2_SetWorkflowVariableOverview

      We have to do this 2 times, once for the approval status and once for the comments status

      Variable 1

      First we are going to save the answer of the first question, which is the approval status, in a new variable:

      23. wizardscreen_step2_SetWorkflowVariable_1

      Fill in the Name of the variable and the type of content you are going to store in the variable:

      24. wizardscreen_step2_SetWorkflowVariable_2

      Click on OK, you should be having something like this:

      25. wizardscreen_step2_SetWorkflowVariable_3

      We’ve created the variable now, but we didn’t tell the variable what he should keep. Click in the ‘fx‘ button which will open up a new dialog:

      26. wizardscreen_step2_SetWorkflowVariable_4

      What do we want to collect? Well we want to collect the things that the human resource manager provided in the task that we’ve created earlier.

      How do we know which Task that was, because there could be more than 1 task? Remember that we’ve saved the ID of the task in a variable, see ‘Variable to collect’.

      So in the Source drop down box pick ‘Tasks’ as the selected source. Once you’ve selected the task list, you have to look for the ‘Holiday Request Approve Status‘ field which we’ve created earlier. In this field you find the answer of the first question.

      Because there could be multiple tasks in that list you need to tell which task you would like to use. Get the task with the ID that you saved before.

      27. wizardscreen_step2_SetWorkflowVariable_5

      this ID is saved in the ‘HolidayRequestTaskID’ variable which you can load by using the ‘fx’ button and choose for Workflow Data.

      afterwardsadded

      Once you’ve setup all the fields click OK and do the same for the comments question.

      28. wizardscreen_step2_SetWorkflowVariable_6

      Wizard step 3

      Next we are going to create a new Workflow step. You can do this by clicking on the ‘Add workflow step’ link on the right side of your screen.

      29. wizardscreen_step2_AddWorkflowStep

      In this step we are going to check what the manager filled in. To do so we are going to compare the answer. The condition that you need to use is the ‘Compare any data source‘:

      30. wizardscreen_step3_CompareDataSource

      In the first option you are going to select the variable where you stored the answer of the first question in, which is HolidayApproved:

      31. wizardscreen_step3_CompareDataSource2

      and in the value part you type ‘Approve’:

      32. wizardscreen_step3_CompareDataSource3

      If this condition is true, you can do a lot of things:

      • update a field
      • add the holiday to a calendar

      We are going to keep it simple and send a mail to the requester of the holiday. So use the actions button to select ‘Send an Email’:

      33. wizardscreen_step3_SendEmail

      You want to send an email to the person who created the item. So next to the ‘To’ textbox, click the addressbook button. One of the users that you van pick is the ‘User who created current item‘:

      34. wizardscreen_step3_SendEmail1

      Complete the other fields in the send mail dialog box:

      35. wizardscreen_step3_SendEmail2

      Once this is done, click OK.

      Normally you will do an action if it is not approved.

      Last step

      Finish the creation of the Workflow and add a new item in your list, if everything went right you should have a new task created for the human resource manager that you’ve selected.

      36. Whooow

      So, I’ve hope that I could show how you can create some more advanced workflows in SharePoint Designer.

      K.

      Copied from http://www.jjfblog.com/2006/12/one-issue-that-came-up-during-recent.html


      One issue that came up during a recent project was how to open items sitting in document libraries in Microsoft Office SharePoint Server (MOSS) 2007 in a new window. I had found various neat ways on how to do this in SharePoint Portal Server (SPS) 2003, including Todd Bleeker’s awesome Content Editor Web Part solution which entails adding a normal content editor web part with some slick JavaScript to a doc lib page that where upon the page loading most “A” tags on the page are modified to open in a new window.

      This web part solution is great, and even works in MOSS 2007 interestingly, but my customer on this project was looking for an even easier solution that did not involve having to manually touch each document library at some point. After some further searching I found the steps to modify site definition files to change the inherit behavior of document libraries so that each time one is created it will automatically have this “new window opening” behavior. Andrew Connell had a great blog post on this.

      All of this info was helpful, however the problem of course is that the site definition structure in MOSS 2007 is quite different from SPS 2003 and so the steps to make these granular modifications have changed. After some tinkering around I finally figured it out (or so it seems, the behavior seems expected so far, no weirdness has yet emerged!).

      Steps to modify the site definition files in MOSS 2007 to open document library items in a new window:

      1. Open the folder: C:\Program Files\Common Files\Microsoft Shared\web server extensions\12\TEMPLATE\GLOBAL\XML

      Apparently there is now a “global” folder for site definition files, I am still trying to understand the mapping of things from SPS 2003 and MOSS 2007.

      2. Find and open the file named “ONET.XML” in your favorite XML/text editor (good old notepad for me please)
      3. On line 693 you will find this line of XML:

      <Else><HTML><![CDATA[<A onfocus=”OnLink(this)” HREF=”]]></HTML>

      Changing this line to as shown below will change the behavior of the textual links to open in a new window

      <Else><HTML><![CDATA[<A onfocus=”OnLink(this)” target=”_new” HREF=”]]></HTML>

      4. On line 838 you will find this similar line of XML:

      <Else><HTML><![CDATA[<A TABINDEX=-1 HREF=”]]></HTML>

      Changing this line to as shown below will change the behavior of the image icon links to open in a new window

      <Else><HTML><![CDATA[<A TABINDEX=-1 target=”_new” HREF=”]]></HTML>

      5. Save changes do an IISRESET and you should be good to go. Of course if you are in a medium or large farm scenario you will need to perform these steps for each front-end web server

      A useful blog post for changing the SharePoint Links list to open links in a new window.


      I was recently looking for the easiest way to modify the links list in SharePoint 2007 to open the links in a new window.  In my case, every link in a links list points to an external site, so they should all be opening a new browser window.
      There were a couple custom features I found, but most required modifying (or replacing) the existing links lists, something that I did not want to do.  Anyway, here’s how to make the change (note:  I modified the original files, this probably isn’t a best practice, and the changes could be lost by updates from Microsoft).
      First, open the schema file for the links list feature.  In my case, it was located at:
      C:\Program Files\Common Files\Microsoft Shared\web server extensions\12\TEMPLATE\FEATURES\LinksList\Links\schema.xml
      In this file there should be two instances of the following:
      <Column Name="URL" HTMLEncode="TRUE" /><HTML><![CDATA[">]]></HTML>
      Replace them both with this:
      <Column Name="URL" HTMLEncode="TRUE" /><HTML><![CDATA[" target="_blank">]]></HTML>

      Then restart IIS (or just the application’s worker process), and now all the links in your links lists should open a new browser window!

      Original Source – http://weblogs.asp.net/bryanglass/archive/2008/03/07/changing-links-list-in-sharepoint-2007-to-open-in-new-browser-window.aspx