Tag Archive: Windows


This is part 3 of a set of posts around creating a Virtual cluster on SQL Server, which I’m creating to raise my awareness of clustering.

Part 1 of this series created the Shared Storage used by the cluster, using FreeNAS.MyCluster

Part 2 of this series created a Windows Cluster using this storage.

This section will cover creating a SQL Server cluster using this environment.

The architecture diagram to the right shows the cluster we are creating. This post will cover the clustering of SQL1 and SQL2.

Step 1 – Starting the Process

The first step is to get the SQL Server media available to the server. I’ve taken a copy of the DVD and placed it on the C Drive on the first node of the cluster.

Run Setup.exe, which’ll install some pre-requisites (you should do this on both nodes, to make for an easier life). When the server’s have restarted, run setup.exe on the active node (SQL1 in my case).

Within SQL Server Installation Center, click the Installation option on the Left, and choose New SQL Server Failover cluster Installation.

image

The Wizard will start, and as normal, will take you through installing the setup support files. Once this has completed, the Setup support rules will run, and any issues will be flagged. This includes a set of checks around Clustering.

image

The one that has a warning here, checking to see if MSDTC is clustered, effectively means that there may be issues with linked server queries, and SSIS. It’s not required for the Cluster to build however, so lets press on. Clicking Next gives us the Feature Selection screen.

image

I’m only going to install the Database engine, Integration Services and Management tools. Click Next.

In the Instance Configuration screen, enter the name for the SQL Cluster.(SQLCluster in my case).

image

Click next to confirm the disk usage requirements, Confirm the name of the Cluster Resource group (selecting the default).

image

Click next, and we are prompted to select the disks for the SQL Cluster. I’m selecting all the unused disks.

image

Click Next, and confirm the Network settings for the Cluster.

image

Click next and confirm the Cluster Security Policy (the default being to use the Service SIDs).

image

Click Next to continue,  for the Services, provide a Domain account, and click next.

Next you are prompted for Database engine configuration as normal, click Next, Click Next on the Error Reporting screen. The next screen is the Cluster Installation rules. These should all be passed, so click Next.

image

Click next and next to start the Installation. The installation will take a little while to run.

Upon completion, you’ll get this:

image

If you now look in the Failover Cluster Manager, you’ll see the SQL Cluster in Services and Applications.

image

Next, you can fire up SQL Server Management Studio and connect to the Cluster.

If you go to Server Properties, you can see that the Server is Clustered.

image

The Default System databases (Master, MSDB, Model and Tempdb) are all now stored in one of the cluster drives, and the default drive for databases will also be that drive.

Step 2 – Adding the Second Node

Next we need to add the second node to the Cluster, so switch to your other Member server, and run setup.exe, from the Installation section choose ‘Add node to a SQL Server failover cluster’.

Run through the installation screens, and note that it should pickup the SQL Server Cluster name when you get to the Cluster Node configuration screen.

image

Click Next, enter the passwords for the Domain accounts on the on the Service accounts page, and click next on the Error Reporting page.

The Add Node Rules page should complete successfully, so click Next.

image

Then Click Install to continue.

When this has been successful, you’ll see:

image

Step 3 – Test it out

I’ve taken a backup of the AdventureWorks DW 2008 R2 database from my laptop and copied the backup to SQL1. Note that to restore a database, it must be on one of the Cluster drives, so having copied the Backup file to the shared drives, I can now restore it.

image

Having restored this database, I can now run queries against it, and see what activity is taking place, through the performance graphs on FreeNAS. You can see from the graphs below that are spikes when the Cluster nodes were connecting, and the then later when the database was copied over and restored.

image

image

image

The next post will be around optimising and getting some performance metrics off this cluster.

As part of this ongoing series in creating a Virtual Cluster, this post will cover the creation of the Windows Cluster, using the Shared Storage created in Part 1.

MyClusterAs can be seen in the proposed architecture diagram to the left, we have a Shared Storage device, and next we’ll be setting up the Windows Servers, then adding the two SQL Server boxes together to create a cluster.

Part 3 of this series will be to create a SQL Server Cluster.

Step 1 – Creating the Windows Servers

I’m going to assume that you can install Windows Server 2008 R2.

We’ll be needing three instances of Windows Server 2008 R2. One running as a Domain controller, and two member servers.

So, go ahead and create those three VM’s, set one up as a domain controller, and add the two member servers to the domain.

Note that each of the Network cards in each server should have static IP Addresses.

For the specification of the servers, I’ve gone with this for the domain controller, since it doesn’t require a huge amount of resources.

image

The two member server’s need an additional network card for the heartbeat connection. To achieve this, both these server’s have an additional network adapter, configured on a private network.

image

Once the two member servers are up and running, go to Server Manager, right click on Features and Tick the Failover Clustering option. Click through the Wizard to install it. Do this on both Member servers.

Step 2 – Adding the iSCSI Targets on Member Server 1

Next, we need to add the iSCSI Target created previously, to the Windows Server. Do this by going to Start -> Administrative Tools and iSCSI Initiator. In here, go to the Discovery Tab, and click Add Portal

image

Then, you’ll be able to click on the Targets tab, and you should see the drives hosted on the FreeNAS VM.

image

Highlight each disk (starting with the Quorum disk) and click the Log on Button. Tick the ‘Automatically restore this connection when the computer starts’ tickbox, and click Ok. Repeat this step for each disk.

image

Next, you’ll be able to go to Disk Management, and you’ll see the disks you’ve just created. For each disk, you need to Bring them online, Initialise them, Create a Simple Volume on them using NTFS, and then take them offline again.

image
Before
image
After

Step 3 – Setting up Member Server 2

Next, we need to add the iSCSI drives to the 2nd Member Server. So go to Start -> Administrative Tools and launch iSCSI Initiator. If you are prompted to Start the Service, say yes. As before, go to the Discovery tab, click Add Portal, enter the IP Address of the FreeNAS VM, and click OK.

Go to the Targets tab, and Log on to each of the drives, and ensure you tick the Automatically log on tickbox.

Next, go to Disk Management in Server Manager, and you should see the drives, Offline, and with Blue lines, indicating the drives are configured.

Step 4 – Validating the Cluster

One of the really helpful features of Windows Server 2008 R2 is the ability to validate your cluster configuration, prior to creating it. It runs a whole long list of tests, and tells you how it got on. Tests include the Disk Subsystem (can both members connect to the drives), Networking (is there a Heartbeat card in both, that communicates, IP Address checks, etc) and checking all the services are configured appropriately.

To validate your Cluster, go to Start -> Administrative Tools and Failover Cluster Management. Then click Validate a Configuration…

image

The Wizard will start, and page 2 will prompt you for your server names. Enter these, or browse for them

image

Click Next, Click Next to choose to Run all the tests, and click Next to run them. It takes a little while to run them all. All being well, you’ll get a list of Green, followed by a screen similar to this:

image

“If the light is green, the trap is clean” – Link

Note: If your validation fails due to an IP Address conflict, and you can’t see a network card that is causing it (since all your servers have Static IP Addresses), there may be an issue with the ‘Teredo Tunneling Pseudo interface’. This can be resolved by going to Device Manager, go to View and click Show Hidden Devices. Right Click on the Teredo Tunneling Pseudo-Interface and choose Disable. Then revalidate your Cluster configuration.

image

Step 5 – Creating the Cluster

Once we’ve successfully Validated the cluster, we can create the cluster. This can be done by Clicking ‘Create a Cluster…’.

image

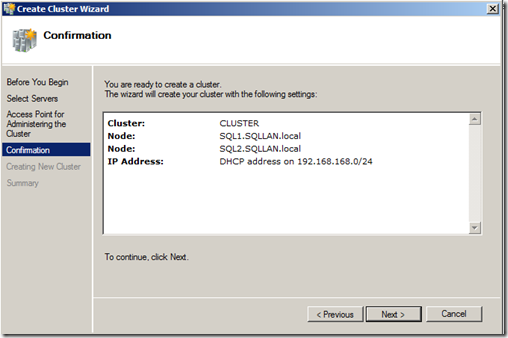
You’ll be presented with a Wizard. Click Next, and enter the names of the two member servers and click next. Enter the name of the Cluster, and if you have DHCP, the IP address will be configured. If you aren’t using DHCP, it’ll need to be specified. Click next, and the information will be confirmed. Click Next and your Cluster will be created.

image

If everything is successful, you’ll get a confirmation screen, and confirmation of the Quorum type configured.

image

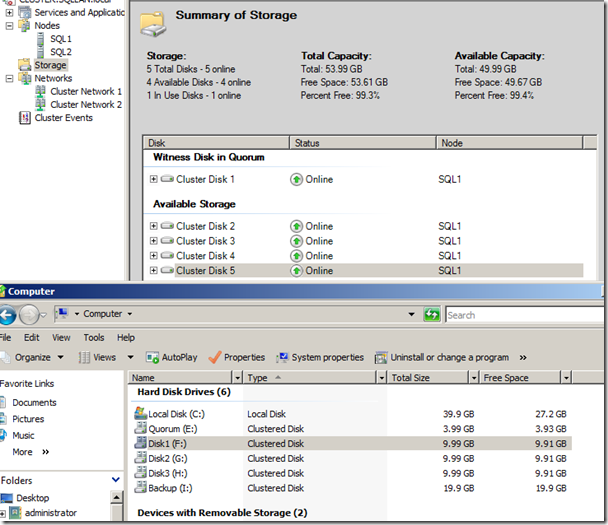
You’ll then be able to see the details in Failover Cluster Management, showing the various disks, and the drives will appear in Windows Explorer, showing the Clustered Disks.

image

So that’s Part 2 completed, we now have a Shared Storage device, and a Windows Cluster running off it, using 4 VM’s. Next we need to install SQL Server on the Cluster to get it doing something.

This post is something that has been bubbling away for quite a while now, and hopefully it doesn’t come across as a bit of a rant. However, I’ve been doing this for 14 years, so have some knowledge of what I’m talking about, but if you have comments, please share in the Comments.

I work as a Consultant, Consultant Developer, Developer or Systems Analyst depending on who you talk to. It’s all just a title, though Consultant Developer is my preference as it is easier for anyone to understand (and it contains the D word..  ).

One of the things that has become more apparent to me recently is that there is a wide range of skills that Consultants have. Ranging from having minimal experience in anything other than their specific area (which they know well), to having in depth experience in everything related to their area. This wide variance seems to be related to either age (so time in the industry), or passion (so the desire to learn more). Sadly, it seems to be comparatively rare to have someone who has a wealth of Experience, and still retains Passion for it.

So given that you can’t gain experience in the industry without time, and Passion isn’t there for everyone, what skills should all consultants have?

In my opinion, they are the following:

1. Ability to install and Configure Windows

If you can’t install Windows, then you don’t have a full understanding of your primary platform, and here, I’m not just talking about the current desktop version. I think you should be able to install the most recent couple of versions of the desktop (XP and Win7) and server(2003, 2008 and R2) OS’s.

This will then give you a level of understanding with Domain security, Networking and how to set up Services (IIS, Active Directory, etc.). While you may not need to do this on a Production server, you may well need to do it for a development (or Test) environment.

2. Understanding of Databases

It’s rare that an application doesn’t require some form of database (from a full blown enterprise system, down to something with a small local store in SQL CE, for example), so not even having a basic grounding in some form of database is a substantial flaw in my mind.

3. Be aware of PowerShell

PowerShell functionality is available for almost all Microsoft products and is part of the Common Engineering Criteria for all Microsoft Server products, so if the MS products you are using don’t have it now, they will have with the next version.

Newer products allow you to view the PowerShell script generated through the Admin GUI, so you can improve your skills easily.

There is a very useful handbook, called the Windows PowerShell 2.0 Administrators Pocket Consultant (also available in Kindle form), which I’ve found to be really helpful in answering questions.

4. Know how to phrase a query in Google

There are alot of people that I meet, and work with who are unable to find things. When asked, they say they’ve checked on Google, but when I look, it’s there at the top of the first page. So, the ability to phrase a query is key. It makes you self sufficient.

5. Use StackOverflow, SuperUser, ServerFault, etc.

These sites are used by a wide range of Developers and IT Professionals, and if you are able to either search for an answer, or phrase a coherent question, you’ll get a prompt response from these highly useful sites.

Stack Overflow profile for Nick Haslam at Stack Overflow, Q&A for professional and enthusiast programmers Server Fault profile for Nick Haslam at Server Fault, Q&A for system administrators and desktop support professionals
Super User profile for Nick Haslam at Super User, Q&A for computer enthusiasts and power users